Body Issues and Kimono

Attackofthe50ftwoman

I have gotten used to being size L, LL, 2L and XL in Japan. Gone are the days where I ever thought of myself as “average”. In the UK I was spoiled. I was the average size. I only needed an L size in snooty fashion shops where all the mannequins were seven feet tall and proportionally would weigh about 90 pounds.

But in Japan I am not M size. I am not average. I’m considered tall (166cm). I’m also considered rather severely overweight according to my health check (I weigh considerably more than the recommended 55kg for women). Strangely, this has affected my self-esteem very little, though it has made clothes shopping a rather unique experience. I now appreciate what plus-size women in the UK complained about – it can either be cute and too small, or hang like a sack and be the right size.

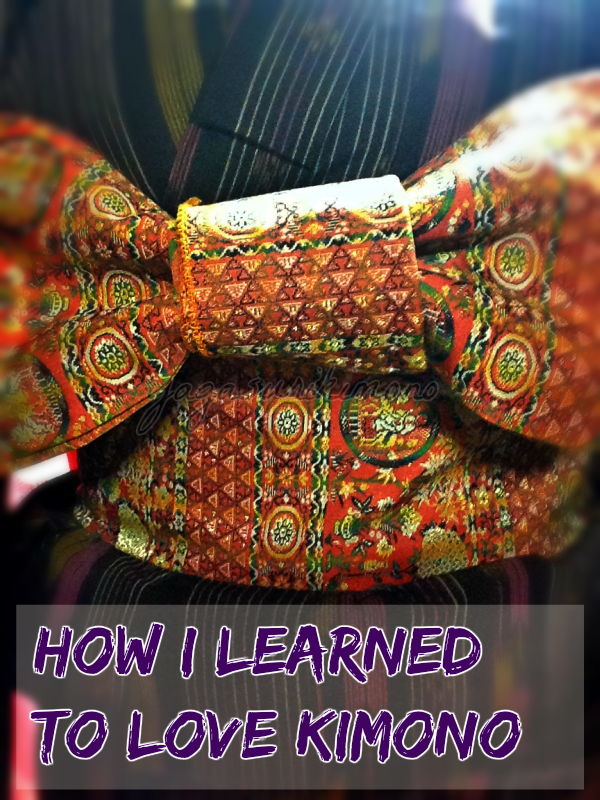
When it comes to kimono, which is a one-size garment made to fit the “ideal” Japanese female shape, I am grossly out of proportion.

For a start, most kimono and yukata hover around the 165cm length. You may notice that’s a centimeter shorter than my actual height. My kitsuke teacher has repeatedly told me that the kimono’s ideal length should be from my shoulders to the ground plus 30cm. I have only found one kimono that is long enough for this. Usually I buy a ‘TL’ size, a kimono that is 175cm, and call it quits.

But TL yukata and kimono have other issues. I can make 175cm work in length, but wrapping it around what I affectionately call my “booty”, requires a little more wriggle room. Then there’s my shoulders, which were large even for England. Oh, and my bust which is almost completely sized out of anything except the plus-size stores. So I need a kimono that is LL and TL.

But TL does not come in LL as well in most cases. You can either be taller, or bigger, but being both means you’re going to have to get creative with ohashiori or resign yourself to never having kimono meet your wrist bone.

Then there’s the parts that aren’t sticking out, but that are going in instead. I have a fuller shape than the one used for traditional kimono, which means I’m padding everything. Even if I compress my bust, I have to pad a great deal at the front to get the kimono to stand out. I remember being dressed for Tanabata last year and the poor women running out of towels to use to pad my in bits to my out bits. Similarly, I need double the amount of padding in the small of my back and at the waist compared to my less inny-outy Japanese friends.

The end result often makes me feel like I’m an overstuffed sausage, bloatedly waddling around with a good extra few kilos of towel and cushion attached to me. Of course, once the kimono is on, it doesn’t look like I have that much padding on, but I know it’s there.

I’m confident in how I look. I like myself. I like my style. I like my hair and my make-up and my booty and my cloven hooves that might have once been feet. Kimono has not changed that, but it has presented some interesting things for me to think about regarding my body. When buying I do have to start thinking that some things may be beyond me due to my size, I do have a narrower selection to choose from even when buying things new.

Am I bitter about it?

Sometimes I am a little. But for the most part, I have come to terms with the fact that I am not kimono shaped, Japanese shaped, or “average” anymore.

And that’s completely and utterly okay with me.

Kitsuke 101: Parts of a Kimono

The first thing that anyone starting kitsuke needs to know is what they’re looking at. As such, before we even start talking about types of kimono, we’re going to look at what makes a kimono a kimono.

partsofakimonofinal

前図 Maezu

  • 袖巾 sodehaba – length of the sleeve
  • 前袖 maesode – front of the sleeve
  • 共衿 tomoeri – top of the collar
  • 衿 eri – the collar itself
  • 衿下 erishita – below the collar
  • 衿肩あき erikataaki – the length of the collar behind the neck
  • 衽 okumi – fabric between two front seams
  • 衽巾 okumihaba – the fabric between two seams hidden behind when the kimono is worn
  • 褄 tsuma – hem
  • 肩山 katayama – shoulders
  • 衽下り okumisagari – length of kimono to the kensaki
  • 剣先 kensaki – point where the collar meets the length of the okumisagari.
  • 前身頃 maemigoro – front left panel of the kimono
  • 前巾 maehaba – hem of the maemigoro
  • 身八口 miyatsuguchi – inside open seam of the sleeve
  • 袖付 sodetsuke – arm hole
  • 振り furi – unattached part of the sleeve
  • 脇るい wakirui – length of the kimono below the sleeve
  • 袖口 sodeguchi – hole where your hand comes out
  • 丸味 marumi – rounded end of the sleeve

後図 Ushirozu

  • 後袖 ushirosode – back of the sleeve
  • 裄 yuki – length between the senui and the sodeguchi
  • 肩幅 katahaba – length between the senui and the start of the sleeve
  • 袖丈 sodetake – length of the sleeve
  • 繰越 kurikoshi – seam across the back of the kimono
  • 背縫い senui – seam down the center of the kimono
  • 身丈 mitake – length from collar to hem
  • 後見頃 ushiromigoro – back of the maemigoro
  • 後巾 ushirohaba – half of the back of the kimono (i.e. one panel)

So there you have it, the names of all the parts! Knowing all of these is not compulsory, but it WILL enable you to be able to read Japanese kitsuke books!

Auction Spotlight: Anpanman!

  
Look at it. Just look at it. This is truly a wonder of modern kimono. Originally used in the theatre, this design shows the popular children’s characters Anpanman and Vikingman. Whimsical and fun and perfect for dressing on Children’s Day! I’d love to see someone actually wearing this kimono!

Here are some pictures and some rough and ready translations from the auction page. 


Second hand kimono sale

Costume sale

Information

The back is stained. It was used on stage. 

Otherwise, it’s just as in the image!

Length: 210cm, width (Yuki): 67cm, sodetake: 53cm

Shipping info is in blue and irrelevant if you use a shopping service. 

In green they ask you to be considerate that colors may differ due to monitors. They also specify this should be treated like an antique and so there will be wear and tear.

Purple says that you should check the images carefully and send them any questions you have. 

Dark green and red tells their contact policies. Their business days are Monday, Tuesday, Thursday, Friday. If you contact them before 3pm on those days, you should get a reply the same day.

Everything below that is either repeated information of something your shopping service can handle. 

Yahoo! Japan Auction page here. You will need a shopping service to buy this kimono. 

Thanks to Jennifer on the Immortal Geisha group on FB for sharing this auction!

Kitsuke 101: Building a Beginner’s Wardrobe

kimono
Image Credit: Okinawa Soba (Rob)

Starting a wardrobe of wafuku can be daunting. There’s all these new words and different styles, different types, different seasons, all these rules and suggestions. So where should a newbie to kimono and kitsuke begin? I’ve written this guide to help you build a basic ensemble that is perfect for practicing beginners kitsuke.

What are you going to need?

  1. A kimono or yukata
  2. Obi maeita
  3. 2 koshihimo (3 if you intend to buy a nagoya obi)
  4. 2 datejime
  5. Korin belt
  6. Nagajuban or hadajuban and susoyoke
  7. Padding and/or kimono bra
  8. Cotton juban
  9. Tabi
  10. Zori
  11. Obi
  12. Obiage (Optional – see Choosing an obi)
  13. Obijime (Optional – see Choosing an obi)
  14. Obimakura (Optional – see Choosing an obi)

Choosing a kimono

Most people start with a kimono, then work backwards to accessories. It’s as good a place as any to start but that flashy furisode you’ve seen on Ichiroya is probably not a great place to start.

Instead, I’d suggest a simple komon in a non-seasonal pattern for your first purchase. Asa no hayagasuri or even something whimisical and modern like a cat pattern, are perfect for a first kimono as they can be worn all year round without breaking any rules.

Alternatively, even though yukata can only be worn during summer months, they are light-weight and inexpensive and can often be bought in prearranged sets. For the sake of practice, it may be cost-effective for a beginner to choose this route.

Look out for the length! You want a kimono that is around your height + 10cm. (For me at 166cm, I often settle for 175cm kimono and yukata which is often as tall as it gets). There is an excellent post on how to measure yourself for kimono here.

Kimono to look for: non-seasonal patterned komon or yukata.

Choosing an obi

Although the most common obi worn with modern kimono is a Nagoya obi, in my opinion it is better to start with a hanhaba or a yukata obi. You can learn basic obi musubi (obi knots) with hanhaba with fewer accessories needed. In fact, with a hanhaba or yukata obi, you do not need an obiage, obijime or obimakura, meaning you can start practicing kitsuke immediately without collecting other items.

If you decide to use a nagoya obi first, then you will need to buy an obiage, obijime and obi makura as well as an extra koshihimo. This will enable you to tie the traditional and popular taiko musubi, but is a higher start up cost compared to a hanhaba.

Avoid heavy embroidery and heavy brocade silks! These are much more formal obi which you won’t have the opportunity to wear often.

Obi to look for: hanhaba or yukata obi.

Choosing undergarments

I’d suggest buying plain colors like white that allow you to mix it with a wide variety of different kimono. Also, a hadajuban and susoyoke is easier to adjust and wear than a nagajuban, in my experience. You can always sew on colorful collars when you need to.

Padding can be created with towels for the beginner. For flattening a larger bust, a kimono bra may be a good investment if sports bras don’t work.

Choosing accessories

Simple and clean is best. Buying something to start that has a high possibility of reuse means that you do not have to buy new things with every kimono ensemble you put together. Try not to buy plain white or black items (white because they are likely used for marriage, black because they are likely used for funerals), but other than that, choose things that you like in colors and patterns that you feel you will get the most use from.

For tabi, white is the most versatile color and the one that must be worn with most kimono that are not fashion kimono.

Accessories to look for: white tabi, versatile zori, and other accessories in your favorite colors.

And that’s it! That’s my advice for building a beginner’s wardrobe for kitsuke. You’ll have everything you need to go out and about in kimono without making a fool of yourself here! Hunt around for bargains on places like Rakuten and Ichiroya and you may even be able to do it cheaply as well!

Good luck!

Note: I am not sponsored by any of the links, nor have I ordered from many of these stores. They are merely there to provide a visual and to show options. Please consider and research all purchases carefully.

Kitsuke 101: Preparing Kimono Before Dressing

kimonosetting
How your finished kimono setting should look

Laying out a kimono is just as important as dressing in it so you don’t get yourself in a muddle or realize you don’t have enough koshihimo until you’re half-dressed. This method is for people who don’t have an iko, or kimono rack, to hang their kimono on before dressing.

The first thing that should be done is that a furoshiki should be laid on the floor, folded neatly along one side and the bottom to create a square. This can be laid out roughly. I usually create a space about 50cm x 50cm, but bigger or smaller is fine depending on how much space you believe you’ll need.

There is an order that all the parts of the ensemble should be laid out and it goes as follows:

  1. Maeita– the stiff board that prevents the obi from creasing.
  2. First Datejime – wider sash used to hold the kimono together
  3. Korin belt – usually elasticated clip to hold the collars in place
  4. Koshihimo – a strip of fabric used to create the ohashiori (kimono fold)
  5. Kimono – the kimono should be folded taking the sleeves (sode) in the left hand and the collar (eri) in the right hand. Fold the sleeves to the collar towards yourself. You then lower the kimono onto the furoshiki until it has been folded four times with the collar pointing towards you when it is finished (away – towards – away- towards).
  6. Second Datejime – used to keep your nagajuban or hadajuban neat
  7. Nagajuban/Hadajuban – your under-kimono with the stiff collar which is folded the same as the kimono.
  8. Susoyoke (only with hadajuban) – If you are using a hadajuban for either ease of dressing or as part of dance classes, you would now lay out your susoyoke or wrap around skirt.
  9. Padding – At this point lay out any padding you will be using – towels or cushions.
  10. Juban – lay out your final undershirt which should be a simple cotton fabric.
  11. Tabi – special socks to be worn with geta and zori.

And you’re ready to go! You may notice that this is the reverse order for getting dressed in kimono! Hence it makes it super easy not to forget to do something important!

(One thing I should mention – for modesty if you are dressing in a public space – you should put on your susoyoke or hang your juban/nagajuban over yourself while getting dressed in order to not flash your underwear. My kitsuke teacher has thoroughly embarrassed myself and my friend enough times that if I ever hear the words pantsu dame again, I will probably spontaneously combust.)

If you’re wearing additional pieces, such as uchikake or preparing a furisode the method is slightly different. This should be used for less formal kimono only.

How I Learned to Love Kimono

how i learned to love kimono

My first kimono filled me with disappointment, something that I’m sure that many kimono collectors and fellow wafuku enthusiasts would be aghast at hearing.

I had moved to Japan roughly six months prior. I had survival level Japanese and, true to every negative stereotype of English teachers in Japan, I used the freedom that came from it to drink too much and party away my money. Continue reading “How I Learned to Love Kimono”